Stamping Around the Villages
Our meeting on Tuesday April 9 at 6PM will be held at the Seabreeze Recreation Center.
Kathy Klein will will show us her folding cards. All you need to bring is adhesive and bone folders.


Stamping Around the Villages
Our meeting on Tuesday March 26 at 6PM will be held at the Seabreeze Recreation Center.
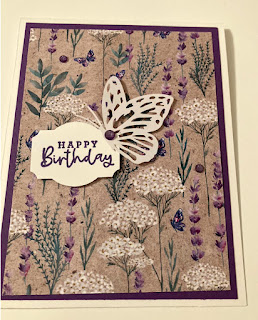
For this meeting Pam is going to present her Spiral-Pop-Up card.

You need to bring a 4¼” x 11” piece of white cardstock scored at 5½”,
a scrap of white cardstock to punch a 1¾” circle and a tag for the
greeting.

She will bring the DSP, Gorgeous Grape cardstock for layering and
inside butterflies, gems and diecut butterflies for the front.

Stamping Around the Villages
Our meeting on Tuesday March 12 at 6PM will be held at the Seabreeze Recreation Center.
Bonnie will show us how to make a colorful card from scraps.
Supplies
White card stock, Colored card stock, Coordinating colored card stock, Bag of scraps (will be provided), Sentiment of your choice, Ribbon and embellishments, Paper cutter, Adhesive
Instructions
Cut 5 1/2 x 8 1/2 piece of colored cardstock. Score at 4 1/4 and fold. Set aside
Cut 3 1/4 x 4 1/2 piece of white cardstock (scrap base). Adhere scraps to scrap base making sure to cover the entire base
Cut 3 3/8 x 4 5/8 coordinating cardstock. Mount the scrap base on this coordinating cardstock. Turn this over and place dimensional on the back. Mount to the card base.
Stamp a sentiment. Cut it out. Place dimensionals on the back. Mount to scrap base (if you’d like to place a ribbon behind the sentiment do this now before you mount the sentiment).
Add embellishments.

Stamping Around the Villages
Our meeting on Tuesday January 10 at 6PM will be held at the Seabreeze Center.
Happy New Year to everyone! I hope that the holiday season was a
happy and joyful one for you! It’s also my wish that 2024 will be filled
with love, laughter and joy.

As usual, our next meeting will be hosted by Jean and I’ve created our
annual 2024 Calendar project. It’s certainly different and I think it’s
perfect for your desktop. Pictures will be attached for you.

Here is your supply list:
2 sheets of plain Cardstock 12x12
Background paper, small print
Wet Adhesive (glue)
Paper trimmer
Scoreboard
If you have a paper collection that is made for a calendar that might work. Otherwise your paper should be coordinating. I also think a 6x6 paper pad would work as well. I will supply the 2024 calendar.

Stamping Around the Villages
Hello,
Our meeting on Tuesday November 14 at 6PM will be held at the Seabreeze Recreation Center.
Bonnie will show us a Double-Flap Card. She will bring her stamp set, die cuts and her manual die cut machine if you’d like to borrow them for this project.
For the BASE:
Cardstock color of your choice (coordinate with decorative paper): CUT 4¼”x11”, score at 5½
Cut off 2¾ on one end for TOP FOLD (save this scrap as you will use it later), fold at score line
Decorative paper (TOP FOLD): CUT 2½”x4⅛”
Coordinating decorative paper (inside): 4”x5¼”
Adhere decorative paper to TOP FOLD
Adhere coordinating decorative paper to inside of card
TOP FLAP:
Scrap from above: 2¾”x4¼”
Decorative paper: 2⅝”x4⅛”
Stamp or die cut approximately 3” tall and 2” wide image
Embellishments if desired
Adhere the decorative paper to the scrap saved from the BASE
Stamp or die cut your image/images
You can use foam dots or adhesive to adhere image to the Top Flap
Set aside
INSIDE FLAP
Cardstock color of choice: CUT 3¼”x10, score at 5”, fold at score line
Basic White: CUT (2) 3⅛”x4⅞”, use embossing folder for one of the cuts
Adhere the cardstock under the TOP FOLD being sure to center it
Adhere the embossed piece to the top of the INSIDE FLAP
Adhere the basic white piece to the inside of the INSIDE FLAP
Adhere TOP FLAP to TOLD FOLD making sure to center it on all sides
Although this card is holiday themed you can make it for any occasion.

Stamping Around the Villages
Debby
will show us
how to make a braided card.
She will bring the stamps that are shown in the picture but you are
responsible to bring all supplies to create this card after you are
shown how to do the braid. Let your imagination run wild, there is
no
limit to what you can do with this.
You will need to bring:
your normal tool kit (scissors, liquid glue, bone folder etc.),
cardstock for your card base – it will be an A2 card. It can be
double sided for more interest if you want or you could have a
double sided piece of pattern paper to glue on to you card stock,
cardstock to mat your card,
stamp(s) and inks, colored pencils, markers or whatever you want
to create an image/design on your card.


